How to coax a palette out of your existing wardrobe;
Identifying your primary colors;
Ideas for using your palette to create new outfits;
Tips for using accent colors in unexpected ways;
Using your palette when you shop!
Once you’ve created your palette based on the clothes already in your closet, carry it with you when you shop! (Click the photo to go straight to my article. Photo is my own, also used in the published article.)
This post appeared originally at my A Musing blog, here.
Click on the dots above to visit my mother ship, Colormusing.com, where you can also sign up to receive Hue News, Colormusing’s own monthly e-mail newsletter!
Since my last Thrift-Shop Thursday post, which focused on finding fabric bargains in the remnant bin, I’ve been thinking about more creative uses for remnants (including pieces gleaned from thrift-shop items). There are so many possibilities that I had to narrow them down to just 2 in this post: garments and accessories that require small amounts of fabric, and color-blocking.
First, let’s define remnants. For me, this includes odd pieces of fabric left over from past sewing projects, as well as the small lengths (usually 2 yards or less) sold as remnants in fabric stores. (Remember the color-blocked top I made entirely out of scrap fabrics?) Remnants could even include parts of garments, like collars or sashes, that have been rescued from otherwise defunct clothes; I think these qualify as remnants because they can be incorporated into new garments as easily as pieces of fabric. And don’t forget about other things that come by the yard, like interfacing, lining fabrics, and trims such as piping, sequins, or fringe; even tiny quantities can make a big impact. You can also rescue beautiful buttons from thrift-shop clothes and reuse them.
Clarification: Although I define remnants pretty loosely, in my posts, when I say “remnants”, I mean pieces that you buy as remnants in a fabric store; “scraps” means pieces you have left over from previous projects, and parts salvaged from old garments.
Tip: How do you decide if a scrap is too small to bother keeping? If you generally make garments, I’d say a scrap that’s at least 12″ x 12″ is worth keeping; it could become a pocket or it could be cut in half to make cuffs, for instance. But if your sewing projects include things like pillows and quilts, a scrap would have to be even smaller than that to give up on it. However, the uses for your scraps will depend on the type of fabric. For example, if what you have left over is small pieces of thick wool coating, well, there may not be much you can do with those, outside of possibly making a clutch purse or something similar that would make sense with that fabric.
Now we’ll get into specific project ideas, starting with garments that require small quantities of fabric.
When you go remnant-shopping at a fabric store, as a general rule of thumb, you’ll probably need at least 1.5 yards to make a simple sleeveless top, if the fabric is 45″ wide, more like 1 yard if it’s 60″ wide.
Tip: Since so much pattern information is now available online, it’s easy to get an idea of the yardage you’ll need for various types of garments before you head to the fabric store. Here’s a simple bias-cut top (this is one I’ve made myself) that would work well with a remnant:
Vogue 9771 sewing pattern. The sleeveless version of this bias-cut top only requires 1.5 yards (45″ wide) for a size 12, making it perfect for using a remnant. (Illustration courtesy of Vogue Patterns; click on the picture to see this pattern and all its yardage information.)
With this one pattern, I see so many possibilities! Yes, you can make the entire top with just one fabric, but wouldn’t it be fun to mix 2 different prints or textures? I once made a sheath dress that was plain black in the front, and the entire back was covered in tiny black shimmery sequins. (I’ll have to use that idea again… I miss that dress!) A beautiful floral print for the front, with stripes for the back would be fun; some patterns, like Butterick 5856, might even lend themselves to combining a knit fabric with a woven one.
Tip: When combining different fabrics into one garment, keep 2 things in mind: 1. All fabrics should be of a similar weight. I’d make an exception to this rule if I wanted to use something sheer, like lace, on part of a garment. 2. All fabrics should be laundry-compatible. When you’re sewing your own garment, pre-shrinking your fabrics ensures that your garment won’t end up with one part shrinking more than another.
You can also use a double layer of fabric, such as a sheer fabric that needs a backing, if you want to combine them with a heavier fabric. I did this for my color-blocked top, because the black fabric I used for the back was much heavier than the others, so everything on the front of this top is double-layered. (This turned out to be a great benefit— almost like having built-in shapewear!)
Other small-yardage garments include pencil skirts and shorts (anywhere from 1-2.5 yards, depending on the fabric width and garment size); remnants can also be ideal for many accessory items, like scarves. Here are some patterns for a few less-expected accessories:
Butterick 5695 pattern for gloves. These require only small pieces of fabric, and could easily be made by upcycling thrift-shop leather garments. (Photo courtesy of Butterick; click on the photo to see this pattern.)
McCall’s 6366 apron pattern. Many aprons require less than a yard of fabric. (Photo courtesy of McCall’s; click on the photo to see this pattern.
McCall’s 6615 boot-topper pattern. This super-fun pattern includes several different styles, any of which would make good use of scraps or remnants. I saw quite a few remnants of faux suede and leather at a fabric store just the other day, but these could be made out of almost anything. (Photo courtesy of McCall’s; click on the picture to see this pattern.)
These are just a few of the possibilities I ran across in a quick tour around Vogue/Butterick/McCall’s patterns, but let’s move on to color-blocking! I had no difficulty finding patterns that are specifically designed for color-blocking, including some I’ve already made myself, like the knit top I mentioned earlier; you can find that pattern here.
Tip: The main issue when planning a color-blocked garment is figuring out how much fabric you need for each block; if your pattern was created with color-blocking in mind, it should list separate yardage requirements for each one (usually called “Contrast 1”, “Contrast 2”, etc.). However, if you’re starting with a pattern that’s designed for just one fabric, but you want to use more than one, the best thing to do is get your pattern pieces out and measure them, making a list of measurements/yardage for each block; laying out the pieces on some fabric from your stash (I hope I’m not the only one with a stash!) is one of the more accurate ways to assess your yardage requirements.
Now for some of my favorite patterns that are designed for color-blocking:
McCall’s 6435 pattern. I’ve made this myself; it’s simple color-blocking, so it might be a good one to start with. (Photo courtesy of McCall’s; click on the photo to see this pattern.)
McCall’s 6511 pattern. The backs of these tops are all in one fabric (not more than 1.25 yards required), and the fronts have 12-13 different contrast pieces listed, making it easy to know what size pieces you need. You could use a remnant for the back, then gather fabric scraps in various colors and textures for the front! (Photo courtesy of McCall’s; click on the photo to see this pattern.)
Butterick 5852 pattern. This requires a bit more of some fabrics (it’s lined, too), but I think it’s a really interesting use of several different materials. (Photo courtesy of Butterick; click on the photo to see this pattern.)
This last one is really intriguing. In the photo, it’s hard to see what’s going on in this color-blocked skirt, so I’ve included the line drawing below to show you the details; I’ve imagined making both pieces with all those tiny-but-too-beautiful-to-toss scraps of lace, sequins, embroidered fabrics, satins…
McCall’s 6712 pattern. This photo doesn’t show the top that’s also included with the skirt pattern (the white top is not part of the pattern), or the details of the skirt, but you can see more in the line drawing below. (Photo and line drawing courtesy of McCall’s; click on the photo or drawing to see this pattern.)
McCall’s 6712 details. The top has 23 blocks, and the skirt has 37! How much fun would it be to play with these patterns? (Click on the picture to see this pattern.)
I have several of these patterns myself, and I’ll be posting photos as I get the garments made. Many of these would work well as TTTW (Take Tango to Work!) pieces, so I’ll probably start with those; the Butterick 5852 dress is a good candidate for using some of my scraps and remnants.
What about you? Do you think you’ll try color-blocking with your own fabric scraps, and/or sewing garments or accessories with remnants? They’re not to everyone’s taste, I admit, but personally, I love creating a color palette, then mixing textures together, for a truly unique look. And projects like these are certainly in keeping with the spirit of Thrift-Shop Thursday, which is not just about finding great deals— it’s about making good use of them. This is especially true when you’re creating your own clothes by combining your fabric scraps with discounted remnants. Now that’s thrifty!
Previously on Thrift-Shop Thursday, in Shopping Strategies, Part 1, I suggested developing your shopping strategy before going to a thrift shop; this boils down to getting as clear as possible about what you want. Today, I’ll continue with Part 2, in which I’ll take a sample shopping trip and see how well my Part 1 strategy works (or not)!
In my own Part 1 strategy, I decided that I was going to continue looking for Take Tango to Work! items. However, since this week’s Makeover Monday, where I took the collar off a shirt to use as an accessory, I’ve been thinking about all the possible variations on this theme, so I’ve revised my plan. Here’s my new shopping strategy for this trip, condensing the 3 steps from Part 1:
Pick a priority, make it as specific as possible, then pick a store. My new priority is to find shirts with (a) a collar plus a collar stand, and (b) some sort of visual interest in the collar. This could be just a beautiful color, unusual fabric, or embellishment, like beading, embroidery, or trim. The Value Village store that’s closest to me is enormous, and has a large selection of button-down shirts, so I’ll go there.
Tip: Take a tape measure with you! In thinking about my collar project, I realized that it wouldn’t have to be garment-size-dependent. In other words, I could take a collar off, say, a size 20 shirt (equivalent of XXL), and it would still work; it would just be looser around my neck. (This would make it lie more like a necklace, actually, so if you happen across a beautiful beaded collar on a garment that’s way too big for you, don’t pass it up!) So before I left for Value Village, I measured around the inside of my Makeover Monday collar, which was 15″ when buttoned. This is close-fitting but not tight on my neck, so I’m adding bigger-then-15″ to my strategy.
Off to shop! Here’s what my Value Village store looks like:
My local Value Village store. Enormous, non? And this photo doesn’t even show the furniture, housewares, books, etc. Now we can see the value of going in with a plan! (Click on the photo to find your Value Village.)
I’m working on some fairly major makeovers right now, none of which are quite ready for their close-ups, so I’m going to take a little break from the projects this week, and give some thought to my whole makeover concept.
If I was going to have a total makeover myself (clothes, hair, makeup), I would only consider it a success if the changes were more than just superficial; helpful shopping advice, greater confidence, more openness to trying new styles, or tips for tailoring clothes to fit me perfectly, for example. And if I apply that same thinking to my Makeover Monday projects, shouldn’t I expect more than, say, newly-dyed jeans or a scarf turned into a sweater?
I’d like to think, when I’m choosing and working on my Makeover Monday projects, that you’re getting more than just a tutorial; after all, maybe you don’t actually have a pair of jeans in need of an overhaul, or a scarf that you love and yet don’t wear. If that’s the case, I still want you to derive some benefit. So now, after quite a few weeks of makeovers, maybe it’s time for me to ask myself: Is there more to my makeovers than meets the eye?
The more I think about the answer to this question, the more I come back to the original intent of this blog: to inspire you to think about, and wear, the clothes you already have in new ways. That may involve repairs, alterations, embellishments, or all-out makeovers, or it might be simply rethinking the way you use the items in your current wardrobe. I’ll give a simple example from my own closet: jeans (recognize them from a previous Makeover Monday?), cowl-neck knit top, tweedy jacket, and my very favorite (okay, only) Hermes silk scarf, a souvenir from my very first trip to Paris over 20 years ago. Here are 3 ways I wear the same scarf:
1 scarf 3 ways: draped and tied at the neck, swinging from a belt loop, and embellishing the bag.
As much as I always look forward to cold weather (at least since I moved away from Ohio’s sub-zero winters), I’m sometimes stymied when it comes to giving all those sweatery layers a good dose of style. Let’s face it… the practicalities of dressing for winter weather tend to outweigh my parallel urge to make a fashion statement. If I’m starting with, say, a thick (read: less than shapely) sweater, how do I raise the style quotient without sacrificing warmth?
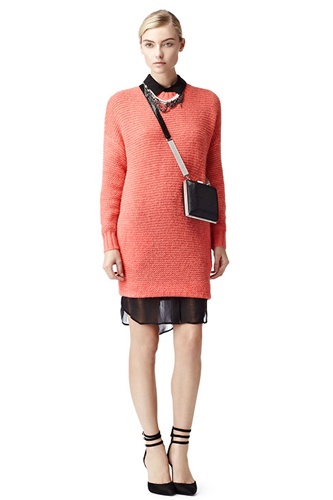
Refinery29, bless their fashionable hearts, sent me this slideshow today, showing 7 fantastic ideas for giving your cold-weather staples a glam upgrade. Here’s one of my favorites (and an answer to my previous sweater question):
Great idea for layering a thick winter sweater, courtesy of Refinery29! (Click on the picture to go to this picture in the slideshow.)
Here’s a great way to get your holiday shopping started (don’t tell me you’re done already!): a festive sale from Tresors de Luxe! You can thank me later. ; )
Hello to all our fashionistas and lovers of affordable accessories! Being that we are only 9 days away Thanksgiving, and just 41 days to Christmas we’ve decided to throw all caution to the wind and start our Holiday Sale now!!! We hope you start your shopping now, get the pieces you want for your friends, family and maybe even something special for yourself! We’ve added new pieces to our hottest collections, and are jazzed that we can bring such high quality to you at even lower prices! Since we’re an exclusive online boutique, we carry only a few of each item, we want our unique pieces to shine and have people wondering, “Where’d she get that?!” Shop now before these amazing deals are gone!
Remember, we offer FREE shipping on select items each week and a beautiful FREE jewelry bag with every purchase!
Airports Made Simple sent me this note today: “I have a question for you – this occurred to me today as I was walking my dog. It’s cold here, so I typically wear a warm cable knit hat that fits over my ears or a beret/beanie that’s warm. However, as you know…it doesn’t protect my skin from the sun like my ‘summer hat’ (a large garden hat or wide-brimmed beach hat), and I sometimes forget the sunscreen in the winter. Besides always wearing sunscreen (which I should do anyway!!), is there a winter hat style that is warm and also provides sun protection for the face?”
This is such a great question! I am very fair myself, so I’m a lifelong sunscreen user, but sunscreen alone is sometimes not enough. (Did you know that, even on a cloudy day, up to 80% of harmful UV rays still get through?) So I also love my wide-brimmed summer hats, but in the winter, they just look… wrong. Airports Made Simple raises a good point: in the winter, can a hat protect you from both cold and sun? Does the perfect winter hat actually exist?
I love hats myself, and coincidentally, I happen to have a wide-brimmed wool hat, for which I braved the blog camera (oh, the lengths I go to for you, my wonderful friends!):
My wide-brimmed wool hat: Yes, it keeps me warm and dry, but let’s be honest— it’s pretty dull, and not all that flattering. Which is why it’s mainly my rain hat. Continue reading →
After writing my last post about evening coats (Warm Evenings: Dress Up Your Coat!), I got to thinking: what is that makes a coat “evening”, anyway? Sure, there are the duchesse-satin numbers, the velvet wraps, even some occasional cape drama— but how many of us own any of these, or want to? Since I’m not on the socialite circuit, let alone on the red carpet (yet), where’s the use value? Even with all the financial doom-and-gloominess, we still want to buy new clothes— we just expect more versatility. As I suggested in the previous post, why can’t one coat work for everyday use, as well as for dressier occasions?
To get into that day-coat-for-evening concept a little more, I thought I’d let you in on my getting-ready-for-the-museum-party (mentioned in the previous post) thought process.
Step 1: Pick a dress. I narrowed my choices down to 3 possibilities: the favorite, the pinch-hitter, and the in-case-of-emergency. And here’s where I ran into my problem. As I was trying on my favorite (a 1950s fit-and-flare-silhouette dress that I made with pale aqua silk noil to which I added an overlay of dark brown metallic lace), I suddenly realized it’s November, this dress is sleeveless — I have to wear a coat. Or something of that ilk. Problem: I have no coat/wrap/cape that’s the right combination of color and look to work with this dress.
So I ended up wearing my pinch-hitter dress: a bias-cut print silk georgette, one of my favorites; I got this from Anthropologie over 6 years ago, and I love it just as much now, but it’s quite definitely a summer dress. (Anthropologie called it the “Surrealist Dress”, which made it seem all the more appropriate for a night at the museum.) Here it is:
I just got this link from Shopbop. It’s a slideshow of some amazing multimedia effects, creative combinations of textures, colors, and silhouettes. Yes, these are high-fashion looks, so I send this along primarily as inspiration— just think about incorporating a single idea from these total looks.
For example, in the first photo (the model with the golden statue, below; clicking on the photo will take you directly to this page of the slideshow), maybe you love the idea of the sky-high burnished-gold boots, but simply don’t get how you can work them (let alone the entire outfit) into your pick-up-the-kids-stop-for-groceries-make-dinner days. Try applying the concept instead: glimmering bronze-finish statement earrings, or perhaps a great belt with a big, gleaming golden buckle.
Via Shopbop: One of the multimedia looks in this inspiring slideshow. Continue reading →
Closet confession #1 (yes, there will be more): I reorganize my clothes regularly, partly to remove the things that no longer work for me, but mostly in an attempt to find the perfect system. Care to make a guess as to my success rate?
The way I’ve generally organized my closet in the past has been by type, i.e. skirts together, dresses together, etc. Here’s how my wardrobe (at least the parts that hang) looked using this plan:
My clothes (the hanging ones), grouped according to item type.