
I’ve written several posts already about dyeing clothes, and more recently, about dyeing yarn. Now I want to focus on a process that has become increasingly intriguing to me: overdyeing!
What, you ask, is this overdyeing of which I speak? It’s simply dyeing something that has already been dyed. Yep, that’s it. So if you’ve dyed your blue jeans (or not so much blue as dirty-wash ones like mine, below), you’ve done an overdye job! Today’s post will focus mainly on overdyeing yarn, but all the basic concepts apply equally to garments.*

Remember this?
Here’s a rundown of my process:
1. Ask yourself: Do I love the color it already is? If no, and if it’s not a dark color already, it’s an overdye candidate. (If yes, put that garment on right now and enjoy it!)
Tip: It may sound incredibly obvious, but the lighter your garment’s original color is, the more options you have, color-wise, for overdyeing. If it’s a dark color, any overdyeing you do will have a more subtle result; this can be really amazing, e.g. overdyeing navy blue with black, but still subtle.
2. Ask yourself: What color do I want it to be?
Tip: So far, in my dyeing experience, I’d say you’ll get the most predictable results by dyeing your garment in a darker shade of its original color. Example: The pale pink jacket I’m getting ready to overdye* is going to become (I hope) an ombré of deep red to medium-deep pink—staying in the same color family as the original hue.
3. Make an educated guess about the dye color you’ll need in order to achieve this new color.
Tip: You’ll have to take the original color into account, because it will blend with your dye color to create a unique new hue (unless your garment starts out white, in which case, technically, you’re dyeing, not overdyeing). For example, if you start with a pale blue shirt, and you want it to be a deep plum color, adding dark red dye to the blue shirt may get better results than purple dye. (For some color theory basics, see this post.)
4. Gather your materials: garment, test garment or fabric swatches, dye.
Tip: Other items needed for dyeing will be listed on your dye package, and will vary according to the fiber content of the fabric you’re dyeing; vinegar, for example, is generally needed when dyeing wool.
Another tip: There are a lot of factors to take into account, such as the fiber content, that can (and most likely will) affect your results. Ideally, you’d experiment with fabric swatches, but this is not always possible; an alternative would be to pick up a thrift-shop garment in the same fiber and color as your overdye-candidate garment, and use the inexpensive version to test your color theory. This part of the process has the added advantage of familiarizing yourself with the dye process itself, which gives you confidence to move on to dyeing your original garment.
5. Dye!
Tip: Again, très obvious: you really do need to follow the dye instructions very carefully, especially regarding safety. The Rit dye company has some useful tutorials here, and they also have a PDF with over 500 color recipes here!
How about some examples of overdyeing yarn? Yes, let’s do that. In my short but colorful history with dyeing yarn, I’ve had some amazing successes, but also some experiences ranging from “meh, I’m just not crazy about the color” to epic failures (one of these is coming soon to a blog post near you). Thankfully, unless you’ve dyed your yarn black, it’s almost always possible to give your ugly yarn a new life! To wit:
My very first overdye experience was with this merino/cashmere blend. The minty-green is not bad, it just looked a bit… flat.

Mint yarn before overdyeing. On the right is the yarn after it was completely dry, showing how much lighter results can be than when the yarn is in the dye bath. (I had used the yogurt container to rinse measuring spoons, my gloves, etc., so the color of this water was constantly changing. For some reason, I thought I’d see what would happen if I dunked some yarn in it. Et voilà.)
Here, I dipped the mint yarn into a fairly diluted deep purple, hoping for something close to lavender.
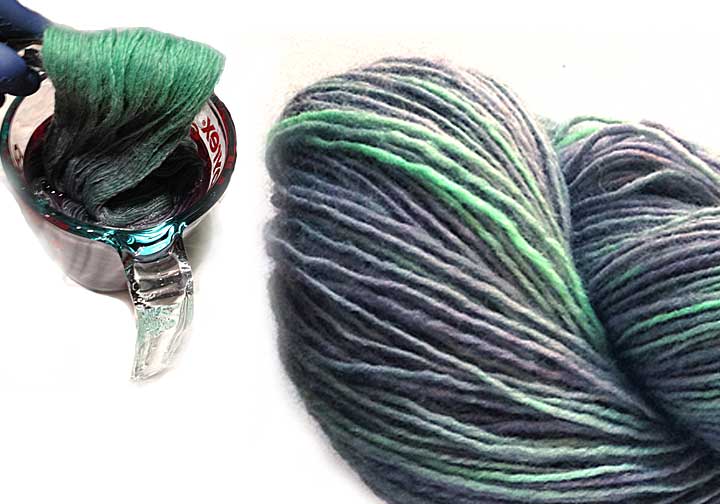
After the lavender dip. At left, I’m dipping most of the mint skein in the purple dye, using a clear paintbrush to hold the top of the skein; I deliberately kept this little part of the skein out of the dye, which resulted in the brighter minty spots in the finished skein (right).
Tip: This project gave me my first inkling of the transparent nature of dyes; if you look really closely at the finished overdyed skein (above, at right), you can see a little of the original mint green peeking through the lavender, giving the skein an overall watercolor-y character that I love. P.S. If you want all the sexy details about this particular skein (and my other yarns), they’re here in my Etsy shop.
Finally, a very recent example: the Emerald skeins I was dyeing for this month’s Birthstone Collection yarns. This was interesting. I dyed a skein of mohair/wool/nylon at the same time as a skein of 100% nylon ribbon (nylon and animal fibers both use the same kind of dye), and got quite different results, as shown in these swatches:

Emerald swatches. The nylon ribbon (left) took the dye as I had hoped, but the mohair blend (right) looks like solid green, with a few turquoise-y spots. What’s a dyer to do?
Fortunately, the mohair skein was large enough to divide into 3 good-sized skeins. So I took 2 of these incredibly green skeins and overdyed each in a separate bath, hoping to achieve an ombré color sequence between the 3 skeins (I decided to leave 1 skein as it was after the first go-round). Here’s the result:

Ombré Emerald mohair set of skeins. Skein 1 is the color from the original dye process; Skein 2 was overdyed with turquoise and sapphire blues, and Skein 3 resulted from the addition of a deeper blue and a little black. Success! (You can find this yarn in my Etsy shop here, and the ribbon yarn is here.)
Again, most garments that you dye will actually be overdyed (unless they start out white), so even though my examples focus mainly on overdyeing yarn, the same general process still applies to dyeing clothes. Once you get over your normal, basic fear of permanently ruining whatever you’re dyeing, I think you’ll really enjoy the process of changing your clothes with overdyeing— and the one-of-a-kind results!
* I have a pale pink cotton eyelet trench coat that I’ve had for years, but which needs a facelift (is that face lift?), so that’s next on my overdyeing project/post list. Okay, that might be after I dye some more yarn. Stay tuned!


