
On this Thrift-Shop Thursday, I find myself wanting to extend the Halloween spirit just a little longer. (Click here to read my special Halloween project post, the alleged reason for this TST post’s belatedness.) To that end, I’ve decided this is the perfect time for a rather extreme idea that starts with not one, but two thrift-shop jackets. Yes, folks, I will be attempting something so wildly, radically, even insanely experimental, it has never been seen before! (Okay, never on this blog.) Follow me into the Changing Your Clothes laboratory as I prepare to create…
The Franken-Coat!

My black-and-white thrift-shop jackets, before entering the CYC lab. 1. Wool/cotton/rayon blend tweed/windowpane plaid jacket, lined. Thrift-shop price: $9.95. 2. Wool/polyester blend bird’s-eye tweed coat, lined. Thrift-shop price: $14.95.
Although I have worn both jackets quite a lot, each has something I’m not crazy about.
- Jacket 1: The rather boxy cut is not ideal for my hourglass body type.
- Jacket 2: It’s both lightweight and soft, so it doesn’t give me as much structure as I’d like.
- And speaking of which, neither jacket has shoulder padding, which would benefit both the hang of the jackets and my figure.
Here’s a rough Franken-Coat mock-up:

Franken-Coat mock-up (or maybe I should say mash-up?). I’ve folded the jacket on top at the point where it’s narrowest, and the jacket on the bottom is folded at its waistline seam. I like the idea of the finished jacket having the feel of a cropped jacket worn over a longer one. Trés Karl Lagerfeld for Chanel, non?
When I first had the Franken-Coat idea, meaning combining the two jackets into one, I thought it could provide solutions to all these issues— not to mention that the result would be a truly unique coat! And these two jackets have plenty of important factors in common, leading me to believe this experiment could be successful:
- Color scheme. Since both fabrics are based on black and white, and both are tweedy, they should blend well together.
- Similar fibers. They share wool in the fiber content, and both have acetate linings, so cleaning the blended coat should work.
- Similar weight. Both jackets are fairly lightweight, which should result in a coat that’s wearable most of the year (at least in the Northwest). Also, if one was considerably heavier than the other, I’d run the risk the heavier part would pull the lighter part out of shape. And it might just look unbalanced. (And I wouldn’t want that!)
There are also some characteristics that promise to make the whole project simpler:
- The buttons are not only a similar size, but they’re also spaced the same distance apart:

Comparing buttons. The fact that the buttons are spaced 4″ apart on both jackets will make it much easier to make these two jackets to look like they belong together. The buttons of the coat on the right are a bit larger, but I’ll have to wait and see if that will pose a problem or not.
Tip: The reason I’m paying so much attention to the buttons is that, once the two jackets are joined together, I will want all the buttons to be the same, to give a sense of unity. Since there are more buttons to use on the longer jacket, it’s possible that I could use some of them to replace the smaller metal buttons on the shorter jacket part, but they may not fit through the smaller button holes. It would be simpler to just replace all the buttons with new ones; I’ll just have to find buttons that will fit through the smaller buttonholes, but not fall through the larger ones. It’s also possible to stitch the larger buttonholes partially closed to accommodate a smaller button. We’ll see about that a little later.
- Both jackets have black linings, so when I join them together, there will be a cohesive look, even on the inside.
- Jacket 2 also has a seamline at the waist, so all I need to do is separate it from the top part, like so:

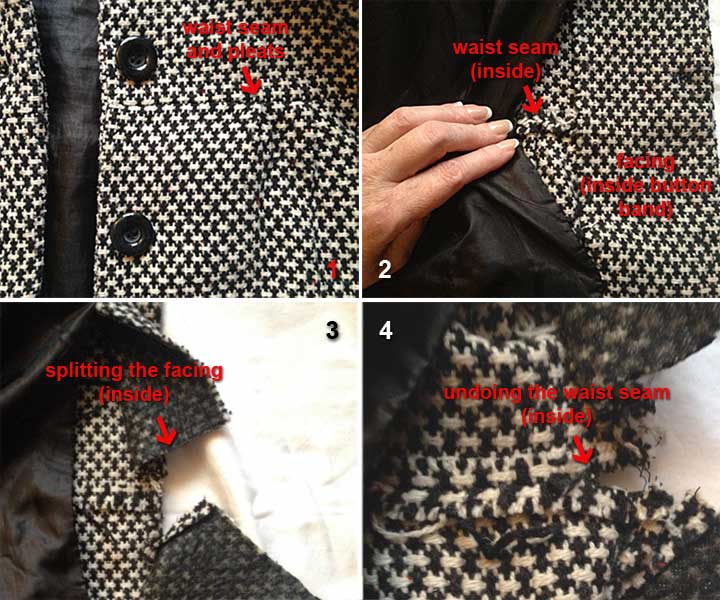
Surgery on Jacket 2. This is a fairly involved process, starting with identifying the waist seam I want to undo (1). Note the small existing pleats. 2. On the inside, I removed enough of the stitching from the lining-facing seam to see the inside of the waist seam. 3. I cut the facing, since it was all in one piece. 4. Starting to undo the waist seam, which will completely separate the bottom of the jacket from the top.
- Surgery on Jacket 1 will be easier; it’s just a matter of determining where to cut. I want to avoid cutting anywhere near the pockets at the hip (they’re real pockets), and I also want to cut so that the button nearest the point of connection to Jacket 2 will be in the right place, relative to the buttons on the Jacket 2 part. I decided to split the distance between buttons, giving me 2″, then adding another .5″ for seam allowance; this means I will be cutting 1.5″ below the second buttonhole:

More jacket surgery. This time I’m simply cutting around the circumference of Jacket 1, after determining where to start cutting. I cut through the lining at the same time, measuring up from the bottom of the jacket as I cut, to keep the cutting line straight.
And here’s my Franken-Coat, all cut up and ready to sew back together:

Post-surgery. You can see that, once the new waist seam is sewn, the buttons of the two sections will be evenly spaced. Hmm… I wonder if Franken-Coat would like to meet Mummy Dearest?
Tip: Before joining the pieces together, take the opportunity to fix and/or change things that you temporarily have access to inside the linings. In my case, I found a pocket lining on the lower part that had a hole which can now be fixed, and I also want to insert shoulder pads into the upper section, between the lining and the outside fabric. (Both these amendments will be shown in Part 2, next Monday.)
Yes, it’s a cliffhanger, but stay with me to find out what happens when I join these jackets together in Part 2, for next week’s Makeover Monday. You’ll see me pin and sew the post-jacket-surgery parts together, use the existing linings as a pattern to create a new printed lining, and add fabulous buttons to finish…
The Franken-Coat!

November 7, 2013 at 11:09 pm
How ingenious and daring – Bravo!
November 10, 2013 at 6:36 pm
I love this idea. I have a couple of coats I may do this with. I was thinking that once you sew the two coats together I think that the project could benefit from some type of black ribbon sewn over the seam to hide the seam and give a nice line to the coat.
November 10, 2013 at 8:52 pm
You know, I was thinking too about a way to make a smooth transition between the 2 parts. I love piping, so I thought about that, but the issue was adding more bulk to not only an already bulky seam, but also to the waist. Tomorrow (Monday), I’ll post Part 2, in which you’ll see what I came up with, and the fab new lining!
And I’d love to see the coat project you’re thinking about too! Thanks for your comment!
Pingback: Makeover Monday: Second Coating, Part 2 | Changing Your Clothes