It seemed so simple at the time. On one of our thrift-shop jaunts, my daughter had found a beautiful cream-colored silk-blend rib-knit top whose shoulder straps were perhaps just a little too long. Little did I know…
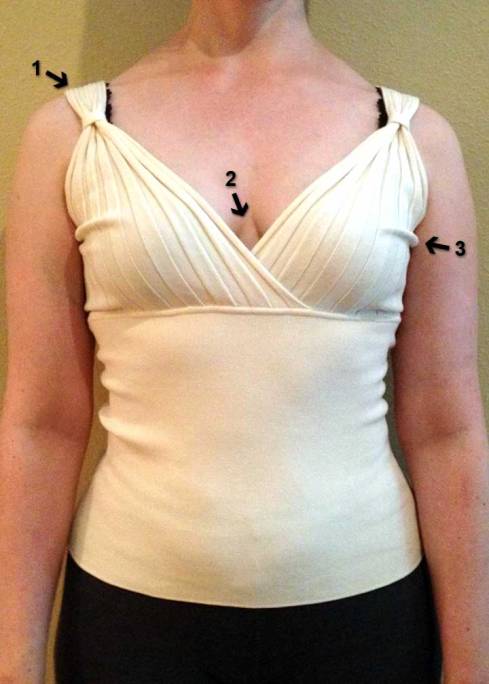
Valerie’s top, before… it turned into an epic alteration project. Issues: 1. Shoulder straps are almost falling off her shoulders, and showing bra straps. 2. Overlapping front panels are too far apart, causing the dreaded gaposis (and showing a little too much cleavage for her taste). 3. Excess fabric under the arms, creating bunched-up areas. What to do, what to do…
Tip: I asked Valerie to wear a bra in a contrasting color, so that we could be really sure if the straps and/or the band in the back were visible or not.
The armhole-shortening alteration is one I’m all too familiar with. Since I am relatively large-busted but with a narrow rib cage and shoulders, when I buy clothes to fit around my bust, they almost always are too big in the shoulders and armholes; if the garment is sleeveless, this is especially a problem, showing a lot more of my bra than I’d like, not to mention threatening to fall off my shoulders.
Aside: Why is it that manufacturers seem to think that if one part of a woman’s body is large (like my bust), the rest will be equally large, including her height? I understand that they’re using averaging to come up with their sizing, but since when does a person get taller when she puts on a few pounds? It’s as if they take, say, a size 2 pattern and simply stretch it out in all directions to upsize it. Proportionally, this doesn’t make sense. End of aside.
So I’ve had a lot of experience with the armhole-shortening concept. However, with this particular top, in trying to come up with an alteration strategy, I was perplexed by a couple of things:
1. Because this top was constructed by essentially knitting the pieces together (not sewn in the conventional sense), there are no seams; instead, on the shoulders, where there would normally be a seam, the front and back appear to be grafted together.
The main issue is keeping bulk to a minimum. No matter how I sew a new seam at the shoulders, the newly-created seam allowances will create bulk. Another issue is that, with this very stretchy rib knit, the fabric is likely to stretch while I’m sewing it; this could actually be beneficial, in that if the strap does become a bit wider because of stretching, it will do a better job of hiding bra straps.
2. The center front poses a similar problem. There is a seam going from side to side under the bust, but it’s an enclosed seam, a technique done on knitting machines. Here’s what the under-bust seam looks like on the inside:
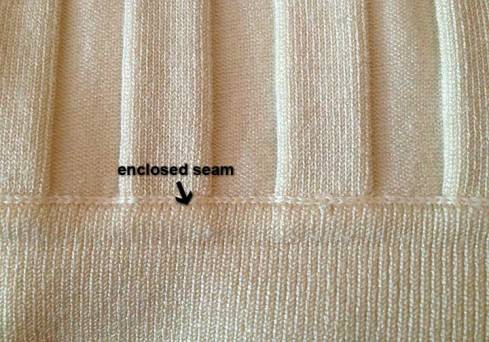
Enclosed seam. This is the seamline that runs from side to side, under the bust. (Shown on wrong side.) Problem: I can’t undo this in order to move the front panels closer together.
Tip: Just for the record, this kind of construction actually shows use of high-quality techniques, and I’m not complaining about that! It’s just that without normal seam allowances to work with, alterations are almost always more complicated.
If there was a normal seam under the bust, what I’d do is undo that seam, and overlap the center panels closer together to eliminate gaping (gapping?); but with this enclosed seam, that’s not an option. Aaargh…
For lack of a concrete plan, I just started pinning to see what would happen. Here, with just one shoulder pinned into a new seam, you can immediately see the difference shortening the strap makes:
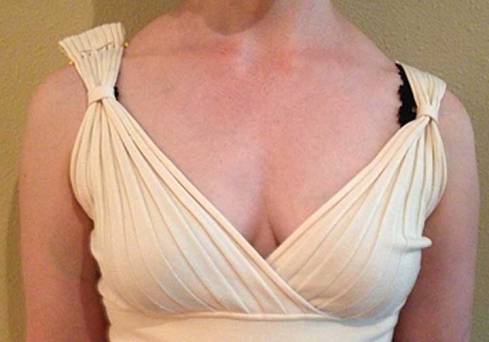
Pinning the shoulders. With 1 shoulder pinned, you can see the difference: most of the bra strap is covered, and that bunching of fabric on the side of the bust is eliminated!
I had been concerned that shortening the shoulder straps that much would pull the under-bust seam up, but that didn’t happen, as you can see in the photo above. My guess is that the stretchiness of the fabric, and possibly the close fit of the bodice under the bust, made the difference.
When pinning the shoulders, I thought I might as well really refine the fit, so I pinned the new seams to fit the slope of Valerie’s shoulders:
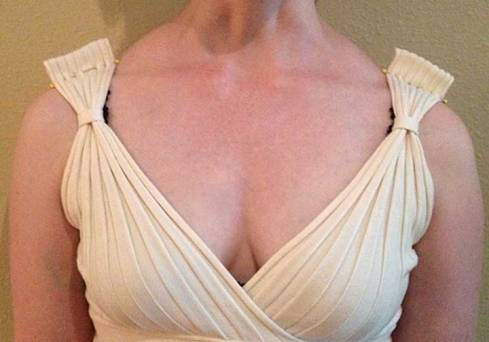
Pinning the shoulders (the sequel): With both sides pinned in place, the improvement in fit is even more obvious.
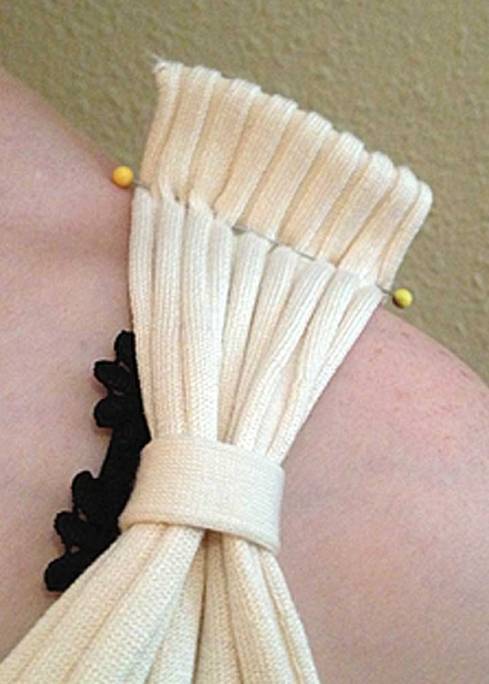
Refining the fit: Instead of following the original shoulder line of the top, I’ve pinned the new seam to follow the natural slope of Valerie’s shoulders.
Now to sew the new seams! As usual when I’m sewing something stretchy, I’m using a wide, shallow zigzag stitch.
Tip: When sewing knits, I always use a ball-point needle in my sewing machine. This type of needle separates threads in the fabric, rather than piercing them, reducing the possibility of snags or runs.
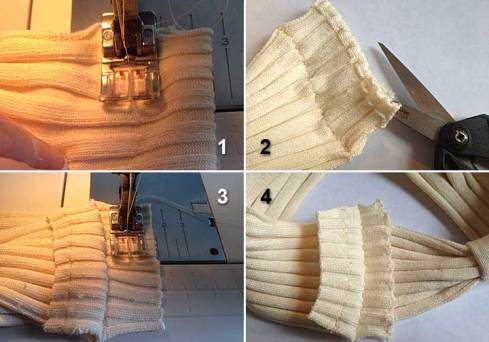
Sewing shoulder seams. 1. Zigzag-stitching the seam. 2. Snipping the new seam allowance open. 3. Zigzag-stitching the seam allowance .5″ from seamline (both sides). 4. The seam allowance on the right has had the excess trimmed away; left side has not yet been trimmed.
Some details about sewing the seams (numbers refer to the photos):
1. I had thought I’d have to stretch the fabric slightly while sewing, but this stuff is so flexible that it stretched by itself in the course of sewing.
2. Because there was no previous seam, I cut the folded edge after stitching the seam, so I could press the seam open; this will make much less bulk than if I simply folded all the excess to one side.
3 & 4. I knew I’d have to finish the cut edges of the seam allowance in some way to keep it from unraveling, as knits are wont to do (don’t you just love that word?). With almost anything else, I’d use my serger, but with all the thread used in serging, I thought it would add unnecessary bulk. So I just zigzagged about .5″ from the seamline, the trimmed the excess close to the stitching.
You can also see in photo 4 that the seam allowances look wider than the straps, due to the stretching of the fabric while sewing the seams. I dealt with this by hand-tacking the corners of the seam allowances into place:
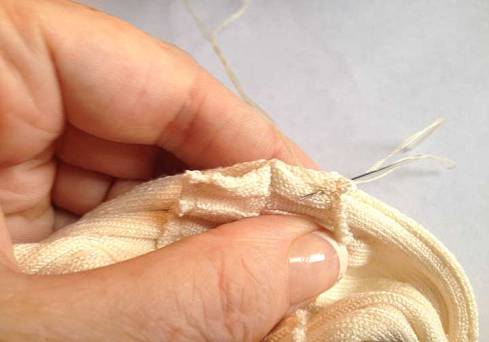
Making tacks. Being careful to roll the outside edge of the top out (where it wants to curl under), I’m carefully making just a couple of stitches on the inside of that roll, to hold the corner of the seam allowance in place.
Tip: To anchor your thread, make your first stitch through the seam allowance, a little away from the corner you want to stitch down. This will allow you to make your final knot under the seam allowance, keeping the trimmed thread ends from showing. And yes, I figured that out the hard way.
Here’s what the new shoulder seam looks like on the outside, after tacking the seam allowance ends and steam-pressing very lightly:
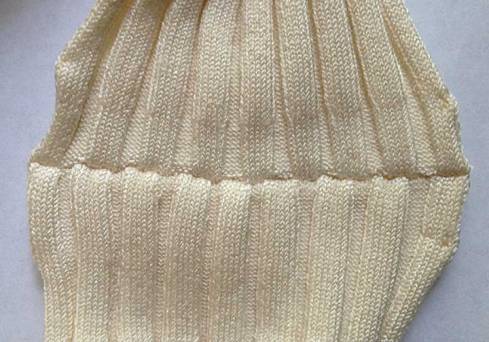
After tacking. If you really look you can tell where I tacked the corners of the seam allowances, but at least there’s no visible bulk showing through.
Tip: It’s a little embarrassing to me to show you that last picture; honestly, it wasn’t until after I sewed both seams that I even thought about trying the match the ribs on both sides of the seams. However, with fabric as stretchy as this (it’s mostly silk with a little Spandex), even if I had hand-basted the seams together before machine-stitching, I’m not sure they would have come out exactly right. If I was doing this over, I’d at least try basting, though.
Whew. Now on to the center front! You know how, with overlapping panels like we have here, if you try and pin them together, you can always tell? Here, I’ve put 1 pin in to see what would happen:
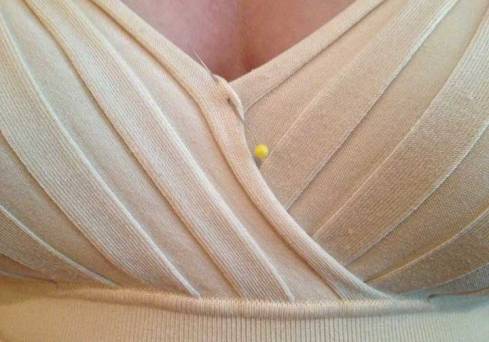
1 pin at center front. This actually doesn’t look too bad, but we both wanted to have more here than just a single tack hold these pieces together.
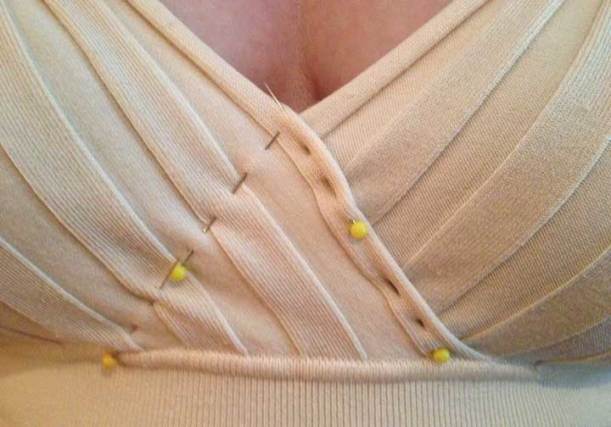
Pinning both sides together. By pinning on both sides where the panels overlap, I think we could create something more secure, and possibly a smoother finish.
The issue now is, how do I sew this in place invisibly? The part that’s pinned on the left side in the photo (above) is where stitching will show the most; on the right, with the natural roll of the edge of the fabric, I thought I could conceal hand-stitching fairly easily. I decided to try a simple blind hemstitch, the same as I would use to make a normal hem:
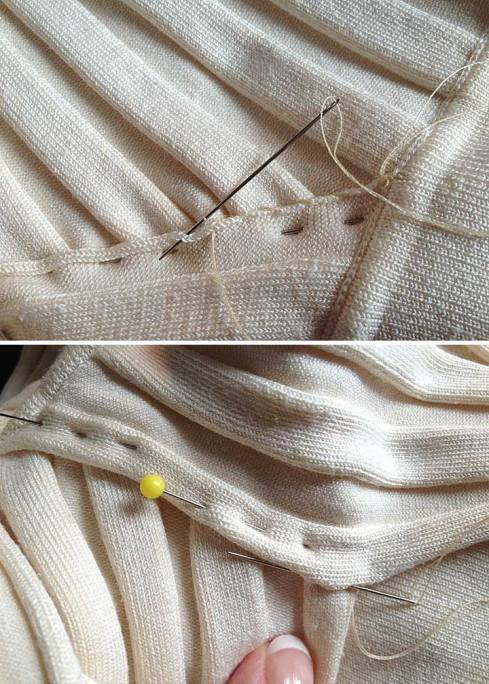
Stitching the center. Top: Working on the wrong side, I’m using a blind hemstitch, unrolling the edge of the topmost panel as I go. Bottom: Working now on the right side, I’m doing the same thing, trying to make my stitches under the rolling edge.
So how did it all work? Here’s the before and after:
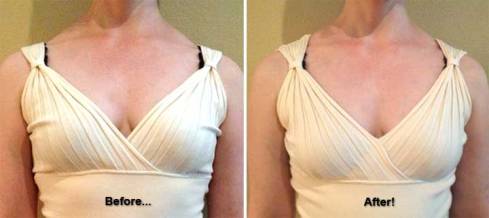
Before & after! The differences are subtle, but effective: The shoulder straps, widened by creating seams, cover more of the bra, the bunching on the sides is gone, and the crisscross center looks smoother and more stable, and is just that crucial bit more covered.
So what seemed at first to be an easy matter of shortening shoulder straps turned into quite the daunting alterations project! I had to figure out how to create shoulder seams where there were none before, without adding visible bulk, by the way, and how to smoothly connect the 2 front panels where they overlap. That may not sound like much, but it was more than I expected, I must say. But I learned a lot, and Valerie now has a lovely silk-blend top to add to her wardrobe (although I don’t think she’ll be wearing it for field work), and for which she paid the princely sum of $4.99!
Late-breaking news: Valerie has decided that the stitching that I tried so hard to make invisible on the center front (the part to left of center in the After photo) is not quite invisible enough. I really can’t disagree. After talking it over, we’ve decided that we’ll see what happens if I take out the not-quite-invisible stitching, leaving just the one side stitched down (the part overlapping on the outside, to the right of center in the photo). I’ll post an update with photos when I get that done.
Special note: Since these tutorials, and the Makeover Monday ones, are quite time-consuming to produce in blog-post form, I’ve decided that henceforth, Thrift-Shop Thursdays will happen on the last Thursday of every month, and Makeover Mondays will be on the second Monday of each month. So look for the next Makeover Monday on September 9, and the next Thrift-Shop Thursday will come up on September 26. In between, I’ll finally be getting to a lot of other ideas I have for you here on Changing Your Clothes— next up (after the knit top update), a new installment of Closet Confessions!
