
Last time on Thrift-Shop Thursday, I was a little time-challenged, so I gave you a preview of today’s project. The concept: start with a knit top that’s a little too short for me, and turn it into the bodice of a dress by adding a skirt (or in this case, 2 skirts). I’ll show you how I made mine, including creating a high-low hemline with the double-layer skirt, attaching the top to the skirt, and adding an elastic casing to the waistline.
First, a quick review. Here’s the thrift-shop top I’m starting with, a substantial silk/viscose knit V-neck:

Jade silk-blend knit top, $7.99 at the thrift shop. Slightly challenging length for me to wear (a.k.a. fine as long as I don’t raise my arms), so it will become the bodice of my new dress.
And here’s the mock-up of my proposed dress, complete with my ORD wardrobe silk scarf, used here as a sash:

Top/skirt dress mock-up. For projects like this with multiple parts and/or colors, I like to lay them out first to approximate the finished look. (Now is the time to experiment, not after you’ve started cutting into the pieces! Don’t ask me how I know this.)
And how, you ask, do you get from the mock-up to the finished dress? There are just 3 main steps:
Step 1: Cut both the top and skirt to the appropriate lengths.
Step 2: Sew the top to the skirt, creating a waistline seam; the seam allowance will become the casing for elastic.
Step 3: Add elastic and close casing.
For my dress, I’m using 2 skirts that are identical except for color; the black one will become the underskirt/lining. Also, rather than leave the skirts at their original length (almost to the ankle on me), I’d like to create a high-low hemline; this is not only trendy, it’s flattering and versatile.

The two skirts I’m adding to my top. These are lightweight jersey knit, so combining the two layers will approximate the weight of the more substantial top.
Step 1: Cut both the top and skirt to the appropriate lengths.
First, determine the length your top needs to be.
Tip: If you’re fairly well-endowed (like me), you may have noticed how some tops (especially stretchy ones) seem to be longer in the back than the front when you put them on; if this is the case, now’s your chance to customize the fit! This just means making the back length a little shorter than the front length, by tapering as you trim.
My top landed a couple inches below my waist, so I trimmed the length by 1″ in back, tapering to .5″ in front, leaving 1″ for the extra-wide seam allowance (this will become the elastic casing in Step 2).
For the skirt, the quickest way to create a high-low hemline in an existing skirt is to reshape the top of the skirt. (I did this for my A Tale of Two Skirts project, to preserve the border print of the skirt that I turned into a peplum overskirt.)
Tip: The only issue to be aware of with this method is that it will skew the side seams, i.e. they will hang at an angle instead of being oriented straight up and down. In this case, the skirts have enough volume that I didn’t think this would greatly affect the way the skirts hang, but this is a judgment call you’ll have to make, based on the skirt you’re using. To be honest, I did mine this way to save time, but I still wouldn’t have made this choice if I really thought it would negatively affect the finished dress.
The other option (and probably the better one in most cases) is to reshape the hem at the bottom of the skirt, and take the time to re-stitch the hem.
I reshaped my skirts’ hems in exactly the same way as the peplum:

Reshaping the skirts to create a high-low hemline. This method is probably the quickest (since you don’t have to restitch the hems), but it will change how the side seams hang; see Tip, above, for another method.
Details:
1. Align the side seams of the skirt in the center. If you’re using more than 1 layer like I am, offset the hem positions so that one is longer than the other. In my case, the black skirt is going to be the inside layer, so it’s going to be the shorter one; I offset mine by 1″.
2. Measure the total length along one side seam, then decide how much shorter you want it to be in the front than in the back. I’m making mine 12″ shorter in the front, so I pin-marked one side (that’s really the center front) 12″ down from the top of the skirt.
Tip: If you’re using the alternative method (see Tip above photo), mark your skirt from the hemline up, instead of from the top down. You’ll need to either cut off the existing hem (if you don’t mind your skirt being a little shorter), or rip out the hem stitching and press it flat before measuring and cutting.
3. Mark your cutting line. Start with your pin-marked spot, then line up your tape measure or straightedge, and mark the whole line with a fabric pencil (or use pins to mark just below where you want to cut).
4. Cut through all layers. In this photo, I’ve turned down the corner of the black layer so you can see the other skirt underneath.
Now you’re ready to attach the skirt(s) to the top! First, if you’re using more than one skirt layer, baste them together at the top.
Tip: I made a silly mistake here: I forgot to turn the black (inner layer) skirt around so that the wrong sides of both skirts were together. Not only that, I didn’t realize it was even an issue until I was almost finished with the dress! Fortunately, because that inside layer is black, it’s not obvious. When you’re making your own, if you’re using more than one layer, please remember to treat the inside layer as a lining, i.e. by positioning its wrong side against the wrong side of the outer layer.

Basting skirts together. Because these are knit fabrics, I used a wide, shallow zigzag stitch for this, which provides more give than a straight stitch.
Now, with right sides together (took me a minute to get this figured out with mine, but it’s worth the effort), pin the skirt(s) to the top, matching side seams and center front and back, and planning for a 1″ seam allowance.
Tip: Because my skirts were considerably larger around the waist after cutting them in Step 1, I decided to gather them slightly (after basting the layers together) to ease the extra fullness into the more fitted waist of the top. However, since this will be a pullover dress with elastic in the waist, I want to allow for it to stretch getting over my head, so I also stretched the layers slightly while stitching the seam with the same wide zigzag as for basting.
Sewing top to skirts, creating a casing, and adding elastic to the new waistline.
Details:
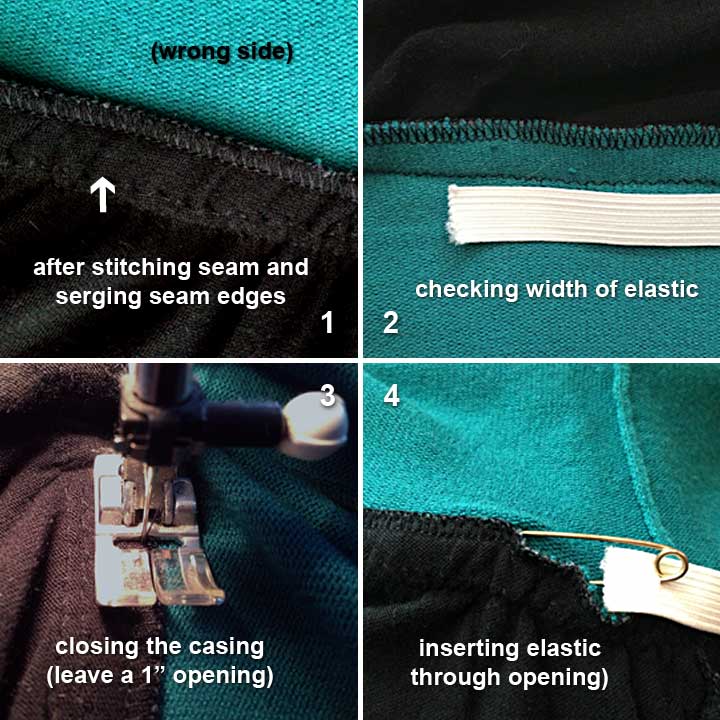
1. Maintaining a 1″ seam allowance, carefully stitch through all layers, adjusting gathers (if applicable; see Tip, above photo), and easing in extra fullness in the skirt. Finish raw edges; I serged mine (shown), but you can also use a zigzag stitch. Finishing this edge connects all the layers together, making stitching the casing much easier. Press seam allowance up (toward the top).
2. Check to make sure that your elastic is slightly narrower (1/8″ or so) than your seam allowance. Looks like mine will barely fit.
3. Still on the wrong side, stitch the finished seam edge to the top, leaving approximately 1″ unstitched; this opening is where you will insert your elastic. In the photo, you can see that I’m stitching almost right on the edge of my seam allowance, still with the wide zigzag stitch.
Tip: Because all the pieces I’m using are different colors, I used black thread in the top of my sewing machine, and teal thread in the bobbin when sewing my casing closed; this way, the stitching is the right color on the outside, as shown here:

Detail of casing on the right side. I used teal thread in the bobbin so that it would match the top (since I was stitching the casing down on the wrong side). Shown prior to inserting elastic.
4. Insert your elastic into the new casing. (There are specialized tools for doing this, but I’m fine with a good old-fashioned safety pin.) Make sure you don’t pull the elastic all the way through— pin the other end to the garment to secure it while you’re pulling it through the casing.
Now all that’s left to do is secure the elastic and finish the casing!

Finishing the casing. First, pull the 2 ends of the elastic out, make sure they’re not twisted, lap one end over the other, then zigzag-stitch them together (top). Then stitch the opening in the casing closed.
Here’s a closer look at my casing, after inserting the elastic:

Finished casing with elastic (right side). Here you can also see the gathering in the top of the skirts.
At this point, if you’ve used the alternative high-low shaping method mentioned in a Step 1 Tip, you can restitch your hems. Otherwise, that’s it! After you finish congratulating yourself on a job well done, you can start playing with accessories:

My finished dress! On the left, well, it does look a little dull, a tad unfinished. On the right, look how the chartreuse scarf-used-as-sash gives it a whole lot of life! A wide leather belt would also be fantastic (don’t forget the over-the-knee boots). A simple dress like this is like a blank canvas!
My thrifty bottom line for this project: The silk-blend knit thrift-shop top was a happy-dance-inducing $5.99; the two skirts were on clearance at Target, totaling $13.90. Grand total: $19.89!
The chartreuse silk georgette scarf (which I made myself from a 50%-off remnant), cost me less than $13.00 in materials, and became one of the most versatile accessories in my latest travel wardrobe. Click here to see the first in my series of follow-up reports on my ORD (Chicago) wardrobe— there’s much more to come!

July 18, 2013 at 5:35 pm
This is lovely!
July 20, 2013 at 6:41 am
Thanks for sharing the mistake you made and how you made it still work. I call these ‘happy mistakes’ that sometimes create unexpected and positive outcomes. Well done on creating a unique and stylish garment for a fabulous price! Have a good weekend, Thea