
The 4 Seasons Project. It started several weeks ago with the idea of creating color sequences based on each season that could then be interpreted for my line of yarns*. (For more on the development of the color palettes and skeins, and to see photos of each season’s color sequences, see A Colorful Year: The 4 Seasons Project on a Musing, my other blog.) Once I had the colors worked out and had put together the skeins, all (?) I had to do was design one or more pieces that could be knitted with this collection of skeins. Or better yet— design a piece that could be finished in 3 different ways! (I think there’s something in me that positively revels in making a project more complex.) The idea I came up with is a scarf that morphs into an infinity scarf (a continuous loop) that morphs into a cocoon-shaped jacket! (Sure… why not?) And since I needed a title for the knitting pattern I was writing, I dubbed this design 4 Seasons 3 Ways.
* I create a line of one-of-a-kind yarns for Knittique; each skein has a color sequence based on the color palettes I develop. You can see these skeins, and the patterns I’ve designed for them, in Knittique’s Etsy shop.
Here’s Version 1: The Scarf

The 4 Seasons scarf. The ends hanging in front are (on left) Autumn, and (right) Winter; Spring and Summer wrap cozily around the neck.
Version 2: The Infinity Loop
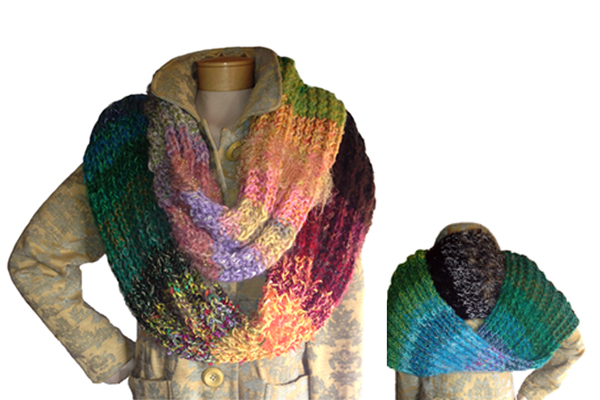
The 4 Seasons Infinity Loop scarf. This piece can be looped and wrapped many different ways, all of them chic, cozy, and warm. (The smaller photo shows how it looks in the back when worn this way.)
And Version 3: The Cocoon
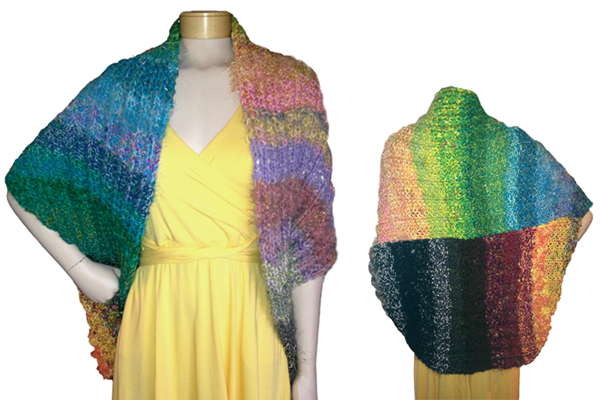
The 4 Seasons Cocoon. Worn this way (back view shown in smaller photo), Summer and Spring are highlighted in front; you can also flip The Cocoon upside down, which would bring Autumn and Winter to the front!
In the course of working on these pieces, all of which are made from the same original scarf (i.e. a rectangle), it occurred to me that I could show you how I did this, perhaps inspiring you to “make over” your own scarves! Honestly, it’s simpler than you would believe. The following are the steps to changing your scarf; I’m illustrating it here with my knitted scarf, but you can do this with almost any kind of scarf (I’m thinking of trying it with a Pashmina).
1. At the risk of sounding obvious, start with a finished scarf. The key things here are the width of the scarf, and the proportion of width to length. My scarf (the one in the top photo) is about 14″ wide x 96″ long; this does make it a “super-sized” scarf, but it’s also soft and flexible, rather than stiff. (You can see in the back view of The Cocoon photo that the width of the scarf has expanded, mostly due to the stretchy nature of the rib stitch.) So the width of your scarf, doubled, will become the length of the center back of The Cocoon, and the length of your scarf will determine how far down it will come on your arms. You really have a wide range of size choices here, and the great thing is that it’s very easy to pin your scarf into either the Infinity Loop or The Cocoon before doing anything else— so you can be sure ahead of time if it will work the way you want it to.
Tip: If you want to knit your own scarf like the one shown, the 4 Seasons 3 Ways pattern is available (in PDF format) in my Etsy shop, and includes instructions for all 3 versions shown here! The yarns and one kit for this project are also available.
2. Transform your scarf into The Infinity Loop. With a knitted scarf like mine, I do my best to graft the 2 ends together as seamlessly as possible; when wearing The Infinity Loop, both sides of the scarf will show, so a seam will be noticeable. Here, I’ve pinned the 2 ends of my scarf together prior to sewing:

Ends of scarf pinned together before grafting; my goal is to align the ribs so well that the seam is virtually invisible.
Tip: to learn how to graft ends of a knitted piece together, click here for a tutorial.
The raised ribs are so dimensional that if I didn’t do a great job of grafting, it would be noticeable, and frankly, I don’t have that much practice with this kind of grafting, so a lot of ripping out of stitches was happening before I got this passable result:

Ends after grafting; it’s not perfect, but it’s pretty good, and there’s no obvious seam on the other side, which is the main goal of grafting. Now I have my Infinity Loop!
Tip: If you’re going on to make The Cocoon, the invisibility of this seam on the wrong side is not as important, since it will be on the inside of your Cocoon. Just make it look good on the outside!
3. Transform your Infinity Loop into The Cocoon. Lay your Loop on a large flat surface (I used the floor, with a sheet laid down first), with your grafted seam positioned at lower center, aligned with the midpoint of the scarf above, like so:

Pinning the Infinity Loop into The Cocoon. The seam that you grafted in Step 2 is at lower center (the dark brown part), aligned with the midpoint of the original scarf; this should be symmetrical. (Photo shows the inside edges already pinned together, leaving a 6″ opening at either end of the seam for arm openings.)
Now all that’s left to do is stitch up this seam! Be sure to leave openings at either end, though; your arms will go through these openings.
Sleeve opening close-up. I left a 6″ opening in mine (to the orange pin at left), but this can be from 6″-8″.
Tip: For a tutorial on seaming knits, click here. I particularly like the Mattress Stitch for seaming.
There— 2 easy ways to change your scarf! I’ve got another knitted scarf I’ve been meaning to make into a Cocoon, so I’ll show that to you when it’s done. And meanwhile, I’ll be going through my scarf stash looking for suitable candidates; I’d really like to try the Cocoon idea with something like a light silk scarf. Maybe I’ll end up with Cocoons for all seasons…

November 28, 2012 at 6:59 pm
Lovely; I adore wearing scarves.
November 29, 2012 at 12:18 am
Wearing scarfs in all seasons: a “must have” here, both for fashion and warmth. Yours is very colorful and pretty.
November 29, 2012 at 12:30 am
Merci! I don’t usually have this wide a range of colors in a single piece, but this was an unusual project for me. I agree with you about the function of scarves– it has to be pretty warm for me to go out without one. You use them a lot in Nice?
November 29, 2012 at 12:59 am
Yes, even though the climate here is Mediterranean and milder, it still gets cold in the winter;in summer mostly worn as an accessory – I usually always have one around my neck 🙂
November 30, 2012 at 1:47 am
This is really cool. I love the seasons concept for the colors, really clever 🙂
Rohan.
November 30, 2012 at 2:38 pm
Thank you, Rohan! I had thought the 4 seasons idea might seem like something that’s been done to death, but I guess it’s always possible to put a fresh spin on it!
December 6, 2012 at 10:01 pm
Adore the color on this scarf! Are you the headless mannequi
December 6, 2012 at 10:03 pm
Sorry- I meant mannequin. And I see its a real one! 🙂
December 7, 2012 at 10:52 am
No, the extremely slender mannequin is not me, but at least I have my head! ; ) Thanks so much for the compliment on my scarf!!